Tuesday, April 30, 2013

Recipe Box

I don't know about you guys, but I LOVE cookbooks. I love them so much, that I own at least 20. This is not helped by the fact that I live super close to one of the best places in the world, The Book Larder, a community cookbook store that does fantastic classes and cookbook author events.

The point is, I love cookbooks! Which is to say I love food, recipes, and, of course, cooking! I also love organizing and decorating, which is why this little corner of my kitchen makes me swoon:

Rock and roll cookbook corner!
And things like this make me want to pull my hair out:

Annoying, unorganized, pile of recipes.
Seriously, I have this pile of recipes just sitting in one of my cupboards positively BEGGING to be organized! So what's been stopping me? Why haven't I organized it? Well, I gave it a half-hearted attempt a couple of months ago and put the pile of recipes in a plastic file box I had lying around after doing some reorganizing of my desk space. The problem? It's not even close to cute, and takes up way too much space.

So what is a girl to do? Look for cute recipe cards and recipe boxes, of course! They're the perfect solution for my problem because they're nice and compact, but also super stylish! And I'm not going to lie, I love any opportunity to bust out my typewriter or practice my handwriting, so I have no qualms about transferring recipes to cute little cards.

I spent some time looking online at cooking stores and home decorating stores, but could only find different variations of the same plain wooden box, like this one. I wanted something a little different, so I hit up Etsy and Anthropologie and found some cute combinations! Here are some of my favorites:

1. Citrus Floral Recipe Cards, 2. Vintage Metal Recipe Box, 3. Bright Floral Vintage Metal Recipe Box, 4. Vintage Watermelon Recipe Cards, 5. Spring Bouquet Recipe Cards, 6. Vintage Floral Recipe Box, 7. Vintage "Here's What's Cooking" Recipe Cards, 8. Vintage Painted Recipe Box.
Etsy has a lot of other great vintage recipe boxes and cute hand-made recipe cards so check it out! I love to mix and match, so I love these combinations because they get along with each other without being matchy-matchy. I'm pretty sure that number 3 and number 4 are going to come live in my kitchen!

Til next time!

-Becca

Sunday, April 28, 2013

DIY Embroidered Pendant


Alright guys, so some of you may know that in the last year or so I've become slightly obsessed with embroidery. I've been collecting (and making!) embroidered art for my hallway, buying more clothing with embroidered details, and have even started making embroidered jewelry.

Today I'm going to show you how to make an embroidered pendant.

In the past, I've made a couple with chevron stripes, but this time I was inspired by my new favorite skirt. Guys, it's gingham and has peacocks embroidered on to it!

We won't be getting thaaaaaat fancy, but here is how you to make an embroidered gingham pendant!


Embroidered pendant supplies.
To get started, you will need some supplies: a small embroidery hoop, some fabric (I used a linen meant for cross stitching), an embroidery needle, a 3 piece pendant setting (I got mine from the awesome Etsy shop, Kailea), a pencil, double sided tape, embroidery floss, snips, and a clear sewing ruler.


         Trace.
Draw in your design.


Begin by tracing around the middle piece of the 3 piece pendant setting using a pencil to get your work area. After it's traced, you can draw in your pattern. In this case, I drew vertical and horizontal lines 1/8" apart to get a checkerboard pattern.


First round of squares.

Put the fabric into your embroidery hoop, tighten it up, and begin! You'll be using a satin stitch for this whole piece, which makes it pretty simple. For the gingham pattern, you'll need a dark colored embroidery floss, a cream or other light color, and then a color in between. I found it easiest to make the dark brown and cream blocks first, alternating between the two line by line, so I could be sure I was getting nice sized squares and was able to keep things even. I recommend doing the squares from top to bottom so you can keep a running stitch.


Checking colors.
I was a little nervous that my in between color wasn't a good match, so I decided to do a trial run before I got too far into the project. I was a touch skeptical at this point, but I kept with it anyway!


Completed with the in between squares.
Dark and light squares complete!
Once you have all your dark and light squares stitched, stitch all the remaining squares with your in between color. Once you're done with those squares, then the embroidery portion of this project is complete!


Cutting to size.
At this point, remove the fabric from the frame and cut around the pendant. I usually leave about 1/2" around the edge.


Next, put strips of the double sided tape on the front and back of the middle piece of the 3 piece pendant setting. Center the embroidery on this piece and place in the frame piece of the setting to check that it lines up nicely. If it doesn't, just unstick and adjust! When the placement looks nice, tightly fold the edges to the back of the middle piece of the setting and adhere.


This last bit is the trickiest part. You'll need to sandwich the embroidery/middle piece between the frame part of the pendant and the backing. Since this is an embroidery heavy design there will be a lot of bulk, so I recommend starting at the bottom. When you get the bulk pretty well set in, bend the bottom prong to secure the back. I just use the edge of my snips to bend it in place. Continue around the other sides of the pendant until all the prongs are secured, and the edges of the fabric are well contained.

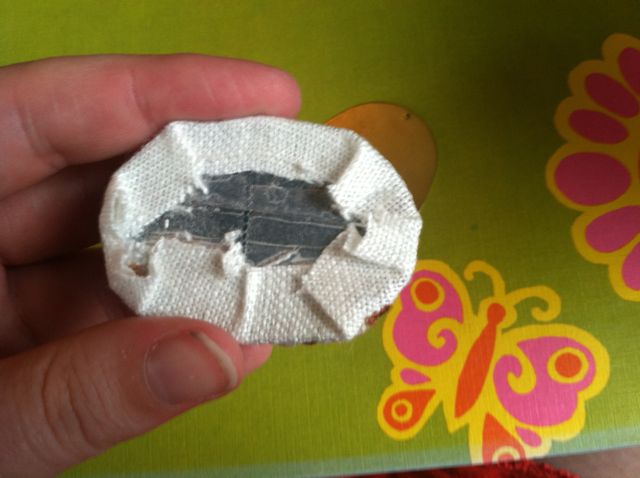
Don't worry if it's not perfect at the back! People will only be looking at the front where your lovely stitch work is!


Pendant complete!


See? Look how cute! To totally 100% complete your project, put your pendant on a chain and wear it to your heart's content.

The best part about these pendants is that they are very inexpensive to make once you have the supplies so you can experiment all you like with other designs. You could do some multi-colored french knots, chevron stripes, flowers, or you could even get fancy and embroider your initials. The world is your embroidered oyster!

I'm excited for the next sunny day to come so i can wear my favorite gingham skirt and my new matching pendant.

Til next time!

- Becca!


Sunday, April 21, 2013

Canning Season Has Begun!

This Sunday has been wonderful! I started off the day with breakfast with a lovely friend, and afterwards we headed to the Broadway Farmers Market and wound up running into a lot of fantastic friends! I love running into people around town because it makes the city seem more like a cozy little town.

My mission for the farmers market was to find some asparagus. I don't know how it happens, but every year I manage to miss asparagus season! Now don't get me wrong, I buy it and eat it (because yum!), but I always mean to pickle it and somehow don't think about it until just after the season has ended. I was not about to let that happen again this year! The asparagus I brought home was gorgeous, and pickling it was a lot of fun!

Spring bounty!
Pickling spices.
Washing jars.
Cutting to size for pint jars.
Time for a rinse!
Blanching.
Packing jars with blanched asparagus and pickling liquid.
Jars sitting after their water bath. Waiting to hear that little *ping* to know it all went well (it did!).
It was a lovely afternoon of canning, particularly with the addition of this helper-turned-asparagus thief! 

Helper!


Thief!


I can't wait to pop open a jar in a month or two and invite some friends over for Bloody Marys.

Hope you all had a fantastic Sunday!

Saturday, April 20, 2013

Welcome!


Hello! 

Welcome to the Ladyface blog! My name is Becca (that's me over there!), and I live in a cute little place in Seattle with a couple of ridiculously entertaining cats. I'm a domestically inclined lady with a discerning eye and a love of all things vintage, homemade, and adorable. Here on the Ladyface blog, you'll get a glimpse into my life and all of my favorite things like cooking, crafting, canning, sewing, and decorating. 

I'm looking forward to sharing my world with you!

-Becca